The most important characteristic values of the object selected in the tree view (customer, system, machine, distributor, circuit, RCD, RCM, IMD, operating equipment, equipotential bonding rail, equipotential bonding conductor, earth electrode, measuring point and location) are managed in the detail view of the stationary objects. Objects cannot be created or deleted here.
Depending on the object selected in the tree view, the master data consists of different numbers of tabs and different amounts of content.
• Customer: customer and contacts
• Location: master data
• Test objects: element, test sequence and tests. For system/machine as test object, additional “Technical Data” tab.
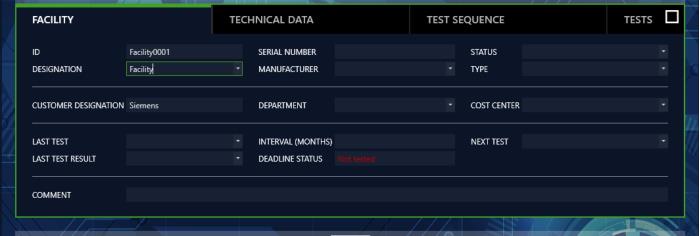
Example, System Tab
Editing
Important data such as the object ID, object designation and characteristics of the respective objects can be entered and edited in the tabs. It’s also possible to attach documents such as images, certificates and operating instructions.
After clicking the entry fields, you can fill them in either by entering text or by selecting text from a drop-down field. As long as the entries have not been saved, newly created objects in the e-tree are identified with a + sign, and edited objects in the e-tree are identified with a * sign.
Note
IZYTRONIQ doesn’t set any limits with regard to the number of characters in the respective data fields, although this may be restricted by the connected test instrument. Please check the technical parameters of the test instrument in this respect. Depending on which test instrument is connected, restrictions apply to the data fields which can be transferred. Please check the technical parameters of the test instrument in this respect.
All entry windows include fields which have to be filled in. If these mandatory fields are left empty, they’re identified by the following icon: . As a consequence, the object cannot be saved. Tab labels and all other associated displays appear in red until the corresponding mandatory fields are filled in.
Customer Object
CUSTOMER Tab
Address and contact data can be entered here for the selected customer.
Tools:
Save changes
Discard changes (with confirmation)
Manage attachment (add, view and delete file/photo)
(Since this tab is a list, the functions of the list view apply and, in addition, the list icons in the toolbar are activated – see
„Lists“.)
Location Object
Location Tab
Address and building information can be entered here.
The locations are broken down hierarchically into four main objects, namely property, building, floor and room. The following data can be acquired depending on the main object:
Property:
Address information, remarks
Building:
Address and architecture information, remarks
Floor:
ID and designation, comments
Room:
ID and designation, comments
Tools:
Save changes
Discard changes (with confirmation)
Manage attachment (add, view and delete file/photo)
The test object is broken down into three or four tabs (TEST OBJECT, TEST SQUENCE, TESTS and, in the case of systems or machines, TECHNICAL DATA).
TEST OBJECT Tab <name>
Important data such as the object ID, object designation and characteristics of the respective objects can be entered and edited in the tab. It’s also possible to attach documents such as images, certificates and operating instructions.
After clicking the entry fields, you can fill them in either by entering text or by selecting text from a drop-down field. As long as the entries have not been saved, newly created objects in the e-tree are identified with a + sign, and edited objects in the e-tree are identified with a * sign.
Tools:
Save changes
Discard changes (with confirmation)
Manage attachment (add, view and delete file/photo)
TECHNICAL DATA Tab (for systems and machines only)
Since extensive data is required for test objects of this type, an additional tab is required. Important information which describes the system can be entered here.
Tools:
Save changes
Discard changes (with confirmation)
Manage attachment (add, view and delete file/photo)
Assignment of test sequences to the selected object is managed in the test sequence tab. Multiple test sequences can be assigned to any given object.
The view of assigned test sequences is displayed as a list. Entering a checkmark to the STANDARD column selects the test sequence with which testing of the object will be performed.
The test sequences themselves are managed in a superordinate sequence pool (see
„Function Sequences“).
Note
Deletion doesn’t clear the sequence itself, but rather only the link. The sequence is retained in the sequence pool.
The details (individual steps) of a sequence can be displayed by double-clicking the sequence or by selecting the sequence and clicking the icon. The sequence steps list then appears, which is displayed instead of the sequence list.
The view is returned to the initial display by clicking the icon.
Tools:
Save changes
Discard changes (with confirmation)
Show sequence details (if currently in the sequence list view)
Show sequence list (if currently in the sequence details view)
Add sequences from sequence pool
Delete sequence assignment – the sequence itself remains in the sequence pool
Manage attachment (add, view and delete file/photo)
(Since this tab is a list, the functions of the list view apply and, in addition, the list icons in the toolbar are activated – see
„Lists“.)
TESTS Tab
Tests for the selected object can be managed and set up in the tests tab. The view of executed tests is displayed as a list.
The tests listed here can have various origins:
– Import of executed measurements from the test instrument or from a file
– Direct performance of tests by means of various methods
The details of a test can be displayed by double-clicking the test or by selecting the test and clicking the icon. The detail view of the test is then opened. If a plus symbol (+) precedes the line, further information can be accessed by clicking the symbol, or by double-clicking – switching between MEASUREMENTS and PARAMETERS is also possible.
The view is returned to the initial display by clicking the icon.
After clicking the tool icon (), the “Add Test” popup appears and offers the following options:
► REMOTE: The application controls the sequence (see
„Remote Function – Automated Sequence Control for a Test“). You can run, control and evaluate test sequences with IZYTRONIQ here. You can have several different test instruments perform tests via remote control, and evaluate them. Attachments can be displayed in the form of circuit diagrams, drawings, instructional photos etc. Measurements can be performed and logged manually with any desired test instruments (see
„Document Management – Attaching Files“).
► PUSH-PRINT: Entries are made by pressing a button on the test instrument (see
„Push-Print – Getting Started“). With the help of the push-print function, measurement results can easily be sent directly to the desired test object in IZYTRONIQ by simply pressing a key on the test instrument, where they can be saved in the Tests tab.
► Manual Entry: This function makes it possible to perform tests with any desired test instruments for which there is no connection to IZYTRONIQ. Tests can also be created which do not require a test instrument, e.g. entry of a quantity. After selecting the “Manual Entry” function and clicking “ADD”, the “MANUAL ENTRY” screen appears. The name of the test must be entered and the utilized test instrument must be selected in the upper content area. The inspector and the date are entered automatically.
Note
Only a test instrument which has been entered to test equipment management can be selected.
Manual tests can then be created line by line in the lower content area. Select the “ADD TEST STEP” function from the toolbar to this end. The current test can be documented in this way, and the following fields can be filled in. The Test Step field is the only mandatory field.
No.
Consecutive number of the test step (automatic)
Step category
Manual (automatic)
Measuring instrument
Utilized test instrument (automatic)
Test step
Test step, e.g. measurement
Min
Minimum value
Max
Maximum value
Result
Resultant value
Passed
Passed
Attachments
Displays any documents that may have been attached.
After saving your entries , manual measurement is completed and the display is switched back to the “TESTS” tab, where the created measurement is then displayed.
“Manual Measured Value Entry”
With the help of the container function, several tests for a selected object can be combined in a single container. This makes it possible to generate a joint report for these tests. The individual tests retain the name of the responsible inspector, and the creator is responsible for the container. In order to create the container, the tests to be included must first be selected. Then select “CREATE CONTAINER” from the toolbar. After clicking “ADD” an entry window appears in which the name of the container and the inspector responsible for it can be entered. Clicking “ADD” again creates the container and returns the display to the Tests tab.
How-to video, “Containers”
Tools:
Save changes
Discard changes (with confirmation)
Display test/container details (if currently in a corresponding test view)
Jump up one level (if currently in a test/container detail view)
Creation of tests in accordance with the aforementioned methods
Delete tests and container
Create container
Transfer tests to container
Clear container
Compare tests: Two or more tests of the same type can be compared with each other. After clicking the icon, the tests to be compared have to be marked. After confirmation, a tabular or graphic comparison view is displayed.
Manage attachment (add, view and delete file/photo)

 . As a consequence, the object cannot be saved. Tab labels and all other associated displays appear in red until the corresponding mandatory fields are filled in.


 icon. The sequence steps list then appears, which is displayed instead of the sequence list.
 icon.
icon.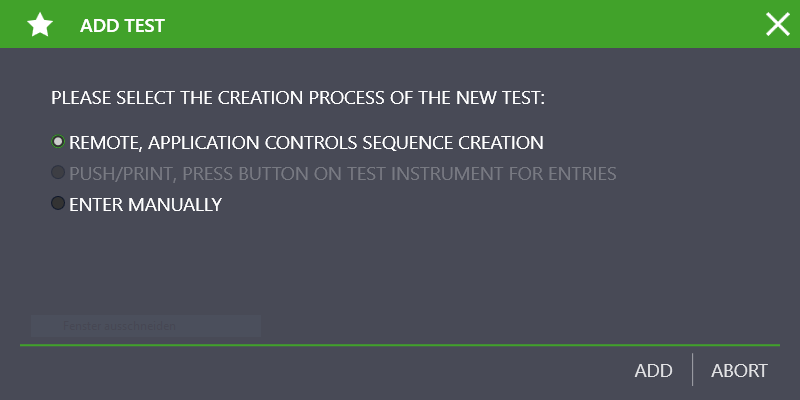
 from the toolbar. After clicking “ADD” an entry window appears in which the name of the container and the inspector responsible for it can be entered. Clicking “ADD” again creates the container and returns the display to the Tests tab.