With the help of the push-print function, measurement results can easily be sent directly to the IZYTRONIQ database by simply pressing a key on the test instrument. The measurement results are stored under the selected test object in the tests tab and can be saved there.
“Push-Print”
Universal Test Instrument Support
The test results from test instruments of any category or standard don’t have to be filed and stored under the same categories (e.g. stationary or portable). For example, measured values from a protective conductor test measured with the PROFITEST PRIME test instrument can be assigned to a portable test object.
Performing a Push-Print Test
A push-print compatible test instrument is a prerequisite for performing a push-print test. If the respective test instrument is not equipped with this function, it’s not possible to select a push-print measurement.
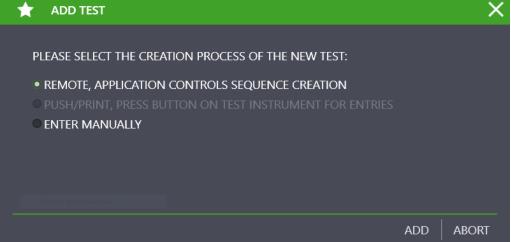
In order to be able to perform a push-print test, both the test instrument and IZYTRONIQ must be set to the push-print mode. This is done by creating a new test of the push-print type in the Tests tab in the detail view for the selected test object.
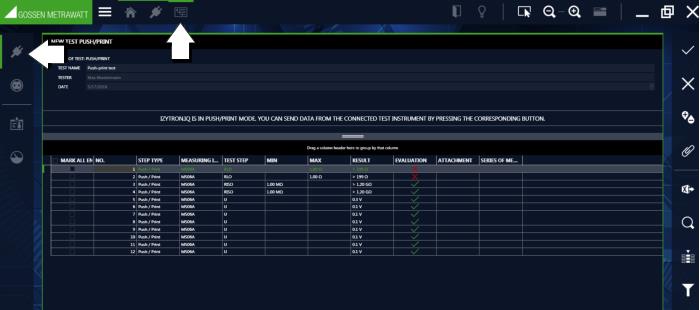
As soon as the "ADD" button is clicked, IZYTRONIQ and all connected push-print compatible test instruments are in the push-print operating mode. At the same time, a two-part push-print window appears and IZYTRONIQ is ready to receive data. The master data of the push-print test are displayed in the upper part of the window, where the name of the test must be added. The transferred measurement data are listed in the lower part after measurement has been completed.
As of immediately, measurements can be sent to the selected test object in IZYTRONIQ by pressing the corresponding key on any instrument that’s in push-print mode.
After completing the respective measurement at the test instrument, a push-print icon appears at the display instead of the save icon. Measurement data is no longer stored at the test instrument in this operating mode, and is instead transferred to IZYTRONIQ by pressing the corresponding key (depending on the test instrument). These are then displayed in tabular format in the bottom window. After all desired push-print measurements have been performed, the transferred data records must be saved by clicking . The push-print mode is exited as a result. At the same time, all test steps are combined into a push-print test and displayed in the “Tests” tab. The individual measurements can be displayed again by clicking the button in the toolbar or by double-clicking the push-print test. You can return to the test view from the individual measurement view by clicking .
The push-print mode is exited by:
• Saving the transmitted measurement data by clicking
• Cancelling the push-print measurement by clicking
Tools:
Save changes
Cancel editing
Manage attachment (add, view and delete file/photo)

 appears at the display instead of the save icon. Measurement data is no longer stored at the test instrument in this operating mode, and is instead transferred to IZYTRONIQ by pressing the corresponding key (depending on the test instrument). These are then displayed in tabular format in the bottom window. After all desired push-print measurements have been performed, the transferred data records must be saved by clicking
  . The push-print mode is exited as a result. At the same time, all test steps are combined into a push-print test and displayed in the “Tests” tab. The individual measurements can be displayed again by clicking the
  button in the toolbar or by double-clicking the push-print test. You can return to the test view from the individual measurement view by clicking
  .
.