Lists : Multi-Assistant (as of BUSINESS Professional)
Multi-Assistant (as of BUSINESS Professional)
The properties of several objects can be changed simultaneously using the multi-assistant function. For example, test intervals can be changed for all objects in the list view.
The multi-assistant is available in the “Enter, Change, Lists” view for portable or stationary objects in the activated list view (green outline) (see
„The “Enter, Change, Lists” Function“). The multi-assistant is also available in the test data preview.
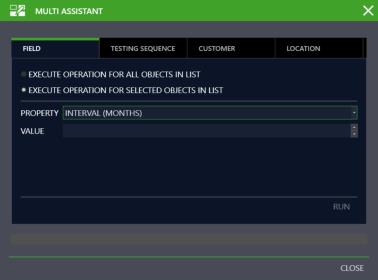
The multi-assistant consists of four tabs: FIELDS, TEST SQUENCES, CUSTOMER and LOCATION.
“Working with the Multi-Assistant”
The FIELDS Tab
Field content for selected object properties can be entered to a list of devices or changed here.
► First select the desired devices via the various selection functions, e.g. via tree selections or the
Filter Editor Function.
The selected devices are displayed in the list view.
► If you want to assign new field content to selected devices only, the corresponding lines have to be selected. Otherwise, the selection applies to all devices in the list.
► After clicking the icon, the multi-assistant tab menu appears.
► The “FIELDS” tab is already selected by default.
► Specify whether the action will be executed for all objects, or only for selected objects.
► Select an entry from the pull-down menu in the PROPERTY field.
► Enter the desired alphanumeric value to the VALUE field.
► Confirm by clicking “Execute”.
Attention!
The multi-assistant is a powerful tool. It makes it possible to selectively change data fields for many objects. After saving these changes, all edited data are irreversibly changed.
The TEST SEQUENCES Tab
Test sequences can be assigned to or removed from a list of devices here.
► First select the desired devices via the various selection functions, e.g. via tree selections or the
Filter Editor Function.
The selected devices are displayed in the list view.
► If you only want to assign a test sequence to or remove it from selected devices, the corresponding lines have to be selected. Otherwise, the selection applies to all devices in the list.
► After clicking the icon, the multi-assistant tab menu appears.
► Select the TEST SEQUENCES tab.
► Specify whether the action will be executed for all objects, or only for selected objects.
Removing Test Sequences
► Click “Remove Test Sequences”.
► Select the test sequences which should no longer be assigned to the devices from the list which then appears.
► Confirm by clicking “Execute”.
Assigning Test Sequences
► Click “Assign Test Sequences”.
► Select the test sequences which should be assigned to the devices from the list which then appears.
► You can also mark a test sequence as the default sequence.
► Confirm by clicking “Execute”.
The CUSTOMER Tab
Customers can be assigned to or removed from a list of devices here.
► First select the desired devices via the various selection functions, e.g. via tree selections or the
Filter Editor Function.
The selected devices are displayed in the list view.
► If you want to assign new customers to selected devices only, the corresponding lines have to be selected. Otherwise, the selection applies to all devices in the list.
► After clicking the icon, the multi-assistant tab menu appears.
► Select the CUSTOMER tab.
► Specify whether the action will be executed for all objects, or only for selected objects.
► Select an entry from the pull-down menu in the CUSTOMER field.
► Confirm by clicking “Execute”.
The LOCATION Tab
Locations can be assigned to or removed from a list of devices here.
► First select the desired devices via the various selection functions, e.g. via tree selections or the
Filter Editor Function.
The selected devices are displayed in the list view.
► If you only want to assign a location to or remove it from selected devices, the corresponding lines have to be selected. Otherwise, the selection applies to all devices in the list.
► After clicking the icon, the multi-assistant tab menu appears.
► Select the LOCATION tab.
► Specify whether the action will be executed for all objects, or only for selected objects.
Removing Locations
► Click “Remove Locations”.
► Confirm by clicking “Execute”.
Changing or Adding Locations
► Click “Change Locations”.
► Select the location that will be assigned to the selected objects in the location tree which then appears.